A detailed guide to webpack and module bundlers in general.
Webpack from dependency graph to configuration!


Hello there, this is the very first article in the series where I write to learn and learn to write. Here I am planning to write articles on topics that I am learning myself.*

If you just came to React-ecosystem, or if you are using create-react-app to build your first few initial projects, you might have heard of webpack or that create-react-app uses webpack and its Webpack-devserver under the hood.
What is Webpack anyway?
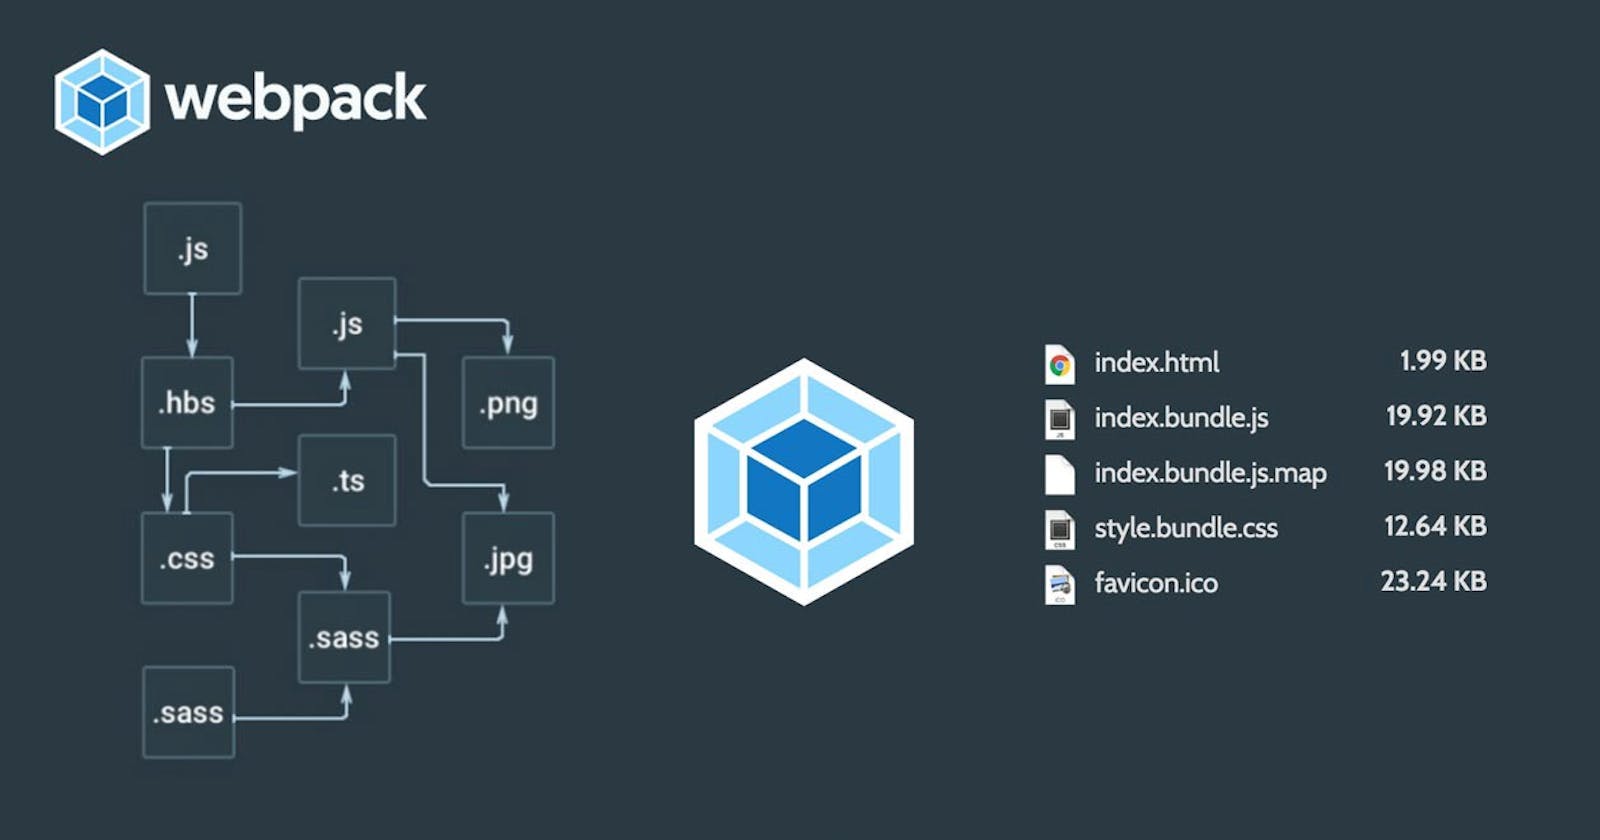
Webpack is a free and open-source module bundler for JavaScript.
In simple terms, it bundles all of the modules of your project into a single module, typically a file called bundle.js.
Why Webpack or any other bundler?
To understand why you should use webpack, let's recap how we used JavaScript on the web before bundlers were a thing. There are two ways to run JavaScript in a browser. First, include a script(a module) for each functionality; this solution is hard to scale because loading too many scripts can cause a network bottleneck. The second option is to use a big .js file containing all your project code, but this leads to problems in scope, size, readability, and maintainability.
So how does webpack help?(story time)
Suppose you have an application, if you were living a decade earlier, life would have been much simpler as you just need to insert your single script in your HTML. But now with all the libraries, life is much simpler as you can depend on these libraries to use 100s of lines of complex code as simple 2-3 lines of code by importing these libraries - except for one thing, you need to make sure that the libraries that you want to use are loaded first and used inside your code.
For simplicity suppose you have to make an API call inside your main.js, you use the AJAX library(not so common these days), it's a simple application and you have done your part well, but oh, there is an error saying that dependency (any package or a library that your code depends on) can't be resolved!
Its is because you might have used AJAX calls before loading AJAX library, like this
<head>
  <script src="/js/main.js"></script>
  <script src="https://ajax.googleapis.com/ajax/libs/jquery/2.1.3/jquery.min.js"></script>
</head>
But you know the error now, you can easily fix it like this,
<head>
  <script src="https://ajax.googleapis.com/ajax/libs/jquery/2.1.3/jquery.min.js"></script>
  <script src="/js/main.js"></script>
</head>
Simple right?
But if you are working on a fairly practical project, it might be more than just a few dependencies, what if a hundred of them? - that's where Webpack comes into the picture, it bundles all of your modules/files and takes care of the order of dependencies.
Core concepts of Webpack
Dependency Graph:
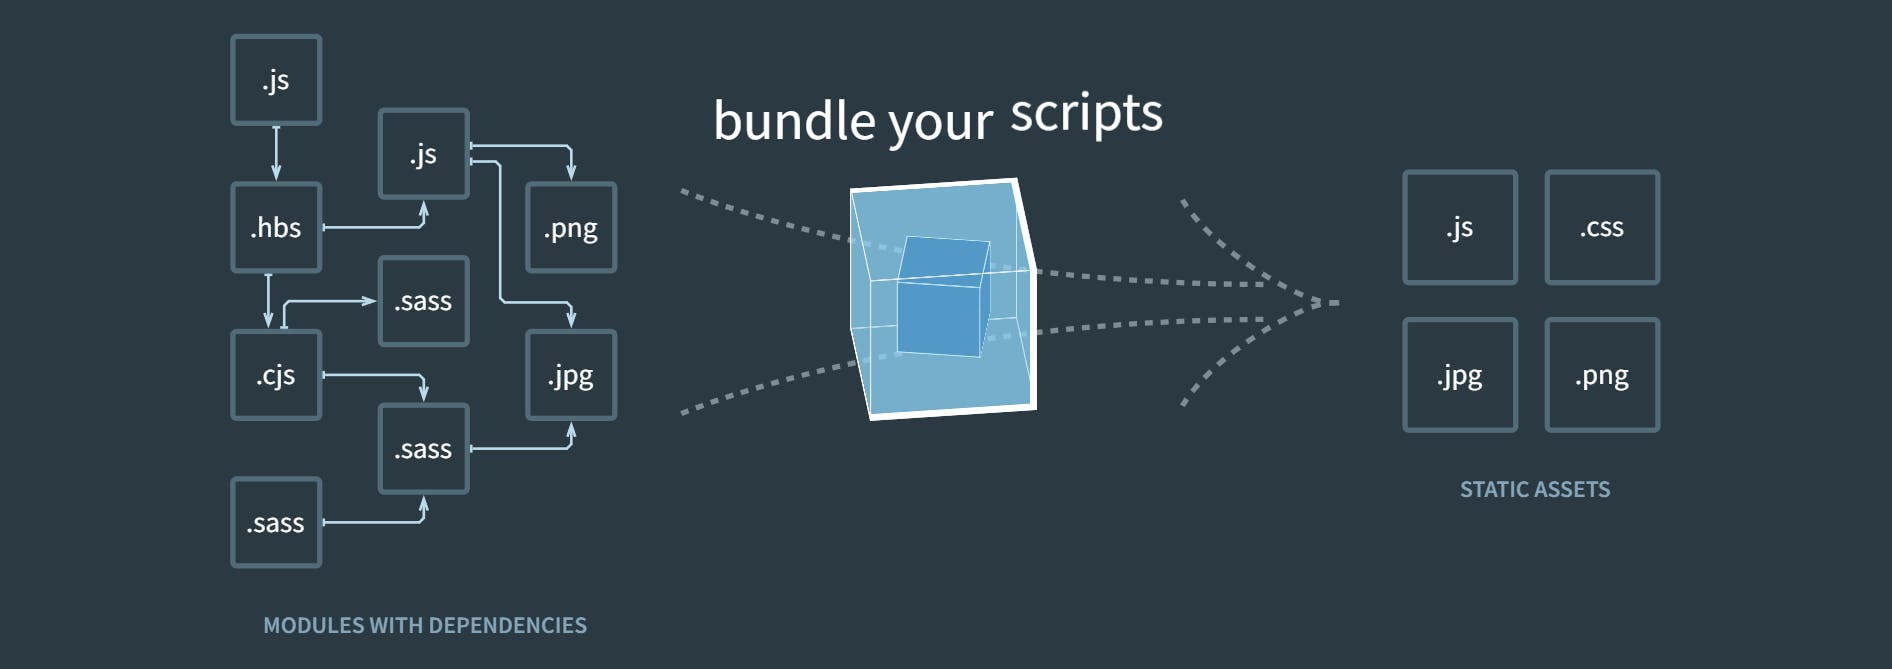
By now, you know that a dependency is an external library that your code depends on, but besides third part libraries, whenever a file1 imports another file2 inside your codebase it treats that file2 also as a dependency. This allows webpack to take non-code assets, such as images or web fonts, and also provide them as dependencies for your application. Thus inherently these files make a web of interdependency, using which webpack creates a graph-like structure called dependency graph.
To simplify, when webpack starts processing your application, it starts with the module given as an entry point in your configuration file(we'll talk about that in a minute), webpack then recursively builds a dependency graph using the set of modules that this entry module needs and then all of the modules that the previous set of modules need and so on. Using this dependency graph webpack bundles all of these modules into a small number of bundles, usually, one - that is loaded by the browser.
Entry & Output :
- Entry : It's a module in the codebase that is going to be the main file, the entry point for your entire application. Webpack is going to use this module to begin building the dependency graph. It figures how this module is going to import some other modules and those modules are going to import yet another file thus forming a tree-like (or graph) structure of dependencies (whenever a file imports any other file, webpack treats it as a dependency).
If you are familiar with data structures, the root node is where your entry point module is going to be, and all other modules below this level will be dependencies. Here is an example diagram of one of my project structures.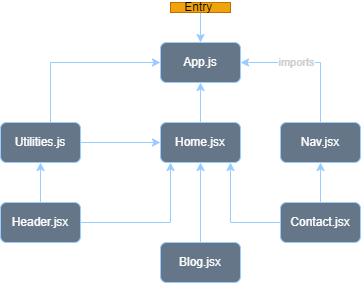
- Output: This is where webpack is going to throw up the bundle code inside your project directory.
Loaders & Plugins:
These are the tools used alongside webpack, before and after creating the bundled module (bundle.js).
- Loaders:Webpack only understands JavaScript(.js files) and JSON(.json files), but unlike many other bundlers, while creating dependency graph, webpack also allows to import other type of files like style sheets (.css files) and SVGs (.svg files), but before importing them to create bundled code, it uses loaders(like style-loader, css-loader) to process these files and only the processed files are then consumed by the webpack.
- Plugins: This one is used after the bundled code is ready to be used. While loaders are used to transform certain types of modules, plugins can be used for a wider range of tasks like bundle optimization, or it to define environment variables when you cannot use an
. envfile directly basically, plugins can be used to do pretty much anything that loaders can't.
How to use(configure) Webpack?
Since version 4.0.0, webpack does not require a configuration file to bundle your project. But it is still configurable, and it's better to know how the core concepts of webpack go into it.
webpack.config.js: Webpack's configuration file is a JavaScript file that exports a webpack configuration. This configuration is then processed by webpack based upon its defined properties, which are as follows,
Entry : This property specifies the entry point module, by default it is
./src/index.jsmodule.exports = { entry: "./app/index.js", };Output:
This property tells the webpack about where to store and how to name the bundled file. It has further two properties, path and filename. By default, it is ./dist/your_bundle.js.const path = require('path'); module.exports = { entry: "./app/index.js", output: { path: path.resolve(__dirname, "mydist"), filename: "mybundle.js" }, };Loaders: This property defines the rules for how webpack should deal with a particular type of file with a specified loader, for each loader there is a rule with two properties
- The test(or loader) property identifies which file or files should be transformed, it is a regex for webpack to match file types
- The use property indicates which loader should be used to do the transforming, can be a string or an array of strings(loader-names)
module: {
        rules: [
            {
                test: /\.svg$/,
                loader: 'svg-inline-loader'
            },
            {
                test: /\.css$/i,
                use: ["style-loader", "css-loader"],
            },
            {
                test: /\.(js)$/,
                use: "babel-loader"
            }
        ]
    },
The configuration above has defined a rules property for a single module with two required properties: test and use. This tells webpack's compiler the following:
"Hey webpack compiler, when you come across a path that resolves to a '.txt' file inside of a require()/import statement, use the raw-loader to transform it before you add it to the bundle."
Plugins: This property specifies an array of plugins to be used. As a plugin is a javascript object, in order to use a plugin, you need to require() it as a module and add its instance to the plugin array.
const HtmlWebpackPlugin = require('html-webpack-plugin'); const webpack = require('webpack'); //to access built-in plugins module.exports = { plugins: [new HtmlWebpackPlugin({ template: './src/index.html' })], };- Mode : By setting the mode parameter to either development, production or none, you can enable webpack's built-in optimizations that correspond to each environment. The default value is production.
module.exports = { mode: 'production', };require(...)to import other files or utilities from npm.
References